
Elbows High - How It Really Works for Front Quadrant Freestyle Technique© Robert Boder |
Explanation of the high elbow position when bringing the hand back and during the pull phase
This is a short explanation of elbow positioning for swimming freestyle with the front quadrant technique. It is written primarily for teenagers who have been introduced to this method but have not mastered all the mechanics of the arm motions. It addresses the two primary errors they make during the learning process. These are elbow positioning and hand entry for the catch.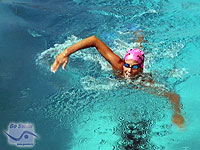 The sequence of pictures starts with the stroke cycle just after the catch point. It is a good view of Karlyn Pipes-Neilsen, the 2004 World Masters Swimmer of the Year, with the high elbow wide entry stroke. It is from her Go Swim Productions DVD so just ignore the head up and smile. Focus on the left elbow position, angle of the shoulders and the right arm recovery. The rest of the pictures are side views but this shows the catch positioning of the hands from the front. Keep this picture in mind as you read. The left hand is at the catch and the right is about to enter the water.
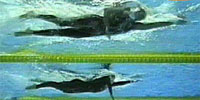
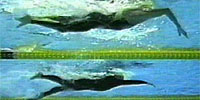 From now on, we’ll be looking at Grant Hackett and Ian Thorpe, the Australian Olympic stars of the early 2000s. Hackett is in the foreground.
Hackett has made his catch and Thorpe is still extending the right arm. See how Hackett’s hand moves under the elbow. This is a side view of Hackett at about the same time in the stroke as Pipes-Neilsen’s picture. Also notice Thorpe’s arm extension and how streamlined his body is. Both swimmers have the right side body core (hips to chest) rotated down. Thorpe is pressing down at his armpit increasing his arm extension. Now look at the hand entry. The position Thorpe’s hand is ready to catch.
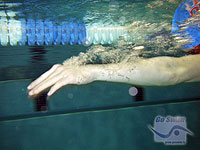 This is a close-up of the entry and glide/extension of a hand entering the water. The hand is clear of bubbles and is preparing to catch. Notice the position of the head (looking down not forward) and how far the hand is under the water with fingertips pointed slightly down. The hand enters the water flat not thumb first. It extends forward without the forearm turning in towards the centerline. This combined with keeping the hand in a straight line with the forearm will cause the arm to move slightly downward towards the catch point. Do not let the hand ride up to the surface. Keep the fingertips below the knuckles at all times. Remember the concept of the catch is to anchor the hand in a position to pull the body over the hand and push it forward. Your body is a sled being pulled by your arms over a line between where your hands are anchored in the snow. So after this picture, the hand goes down towards the bottom without lowering the elbow. Another way to look at this is to think with your forearm. The forearm does not move sideways. It only moves down to catch, back on the pull and push to release.
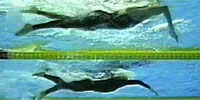 Finally it moves forward on recovery to the point of catch. Pretend there are two parallel walls about a foot apart running along your side. Only the upper part of your arm can move through the closest wall. The hand and forearm stay between the walls.
Hackett has made his catch and is pulling his body through the water over the catch point. Thorpe is making his catch. Notice how high both swimmers’ elbows are and close to the surface. The hands are not under the body. When the elbows are high you look like a crab walking or a surfer on the board to someone in front of you. Look again at the first picture. It shows where Thorpe’s hand is from a front view. The key is the elbow stays up and is not moved down in the water as it would in a traditional pull. This keeps the forearm and hand from pulling under the body. The angle between the chest and the upper arm remains the same throughout the pull. This angle is where the maximum force of chest, back and arm muscles can be applied to the pull. Body rotation determines the depth of the elbow during the stroke. Put your arm under a lane line. Extend the arm then drop the hand under the elbow in a pull. The elbow should be between two lane line discs and is anchored as your body moves forward. Other than the elbow being a little too high this is what the stroke should feel like.
 Hackett is ending the stroke’s power phase. Thorpe is just behind. See how Hackett finishes his pull while the left hand is preparing for the catch. Notice how streamlined his body is. His right hip is rotating up as the hand passes the hip. The rotation at this point is giving a boost to his pull power since arm and chest muscles are not as effective with the arm in this position.
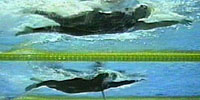 Hackett is somewhat passed the power part of the stroke. The hand is moving faster. He is not pulling as hard. This is the release. His hand continues back to his leg. He will lift the forearm out of the water. The elbow is already out of the water. Thorpe is coming to the end of the pull’s power phase. He will release and let the hand continue back before leaving the water. The actual point of release varies among swimmers. Some coaches advocate holding it a little longer to take advantage of the power boost from hip rotation. Don’t confuse core rotation with shoulder rolling. Rotation is the whole body and is initiated with the hips and chest. Excessive rolling of the shoulders, pushing the shoulder down instead of body rotation or letting the hands cross the centerline on entry will introduce a wiggle motion and no one wants to swim like a snake.
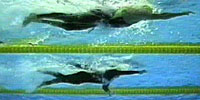 What is important here is that the swimmers’ left arms finished the power part of the pull as their right arms are extended to make the catch. Both arms are in the water. Stand behind a swimmer and it is easy to see just how long both arms are in the water during their stroke. With the body fully extended there is minimum resistance. With the left arm finishing the pull, the “glide” really does not exist in the sense that one arm is still in motion. The hand coming out of the water is moving faster than the hand catching the water so it is a fast version of the catch up drill. Go back to the first picture and note how the recovery arm hand is close to the water surface and outside of the elbow. The hand is being “thrown” forward to have the middle three fingers enter the water slightly outside of the shoulder. Elbow height during the throw depends on the individual swimmer’s shoulder flexibility and amount of core rotation. Too high an elbow during recovery may cause pain in the shoulder rotator cuff. A lower elbow with the hand further out to the side will prevent this condition. During the recovery the arm should be relaxed and not forced into correct positioning with tense muscles. Individual recovery motions vary widely among swimmers. They all share the basics of: elbow higher than hand on entry with proper finger and hand positioning, core body rotation when moving into the extended arm position and finally a great “feel” for the water to make a proper catch. This final stage of the recovery arm motion is similar to a sword thrust. It is not a slashing motion.
Now go back to top and take your next arm stroke. Good swimming!
Credits
This explanation is based on Felix Gmünder's swimclinic website and techniques I have learned from Karlyn Pipes-Neilsen at clinics and practice swims over the past two years. Felix’s web page Timing of Armstroke in Freestyle Swimming is the next step in putting this information into a proper prospective.I also want to thank Glenn Mills of Go Swim Productions, www.goswim.tv, for use of pictures from his web site. The majority of the pictures are from Felix K. Gmünder‘s Analysis of Grant Hackett's and Ian Thorpe's Swimming Technique. This is dedicated to Maddie McDonald, Caroline McNamara and Rob Boder, my son. They are all gifted athletes who participate in competitive swimming on a part time basis. It was by watching them and seeing their efforts to learn this technique from Karlyn that inspired me to write.